
Build your own Raspberry Pi Flightradar Feeder
A small tutorial:
After I have shared my self-built flightradar24 receiver with some friends, many texted me how the installation works and how expensive it is. That’s why I wanted to share this short introduction and tutorial with you. I have tried to make it as simple as possible and for everyone to understand, even without any experience with Linux. In this case I will work with a Raspberry Pi.

Content:
- Hardware Requirements
- Software Installation
- FR24 Statistics and Business Plan
- Links and Sources
Hardware Requirements
Raspberry Pi – Model 3 is on sale at Amazon for 35€
(whether it’s a Model 1,2,3 doesn’t really matter)
USB DVB-T Receiver – available for 23€ with the link below (example)
Micro SD Card ( I prefer to use a min of 4GB, FR24 says 1GB is enough)
Ethernet Cable, Micro USB Cable for power supply
Software Installation
Every Raspberry Pi Project starts with the Raspbian Image ( Linux based operating System). Due to possible later problems with the Dirmngr (a required software tool, for download management), I highly recommend to download Raspbian Jessie Lite, instead of using the newest Jessie image. I`ll leave a link in the link section below.
For the next step insert your MicroSD and format it, so you have a clean start and to then burn the Jessie image onto it. I personally like the free-to-use
To then burn the image onto the microSD I like to use the freeware program Etcher (link below). The program is self-explaining. Select your downloaded image, select the formatted MicroSD and start the process. Once done you can disconnect the Card.
For the first installation and maintenance it is mandatory to either connect a monitor and a keyboard to your Raspberry or establish a connection to another computer to control the Board from there. This can be done with a UART-Connector via the GPIO pins or wirelessly with the SSH Service. As the Raspberry will continuously be connected to the internet the SSH Service is the easiest way. For setting up this remote access you will still have to connect a keyboard and a display first of all. Once the Raspberry is connected to both, the MicroSD is plugged in, the Ethernet cable is connected and the Board is served electricity, you will have to log yourself in (username: pi; password: raspberry), after a short boot-up of the system. After this step you need to enable the SSH Service. Simply type sudo raspi-config to get into the setup and navigate to the “Interfacing-Options”, where you will be offered to enable the SSH Service. Now exit the setup and type ifconfig to see the IP address of your raspberry, which you will need for a remote connection. Take a note of the IP (should look like 192.168.XXX.XX).
The next step is to download a small freeware program called PuTTY, which will allow you to connect to the Raspberry. Once installed and started it will ask you for an IP-address, which you have noted before. I would advise to save these settings in a new profile to be able to access your Raspberry later on. Open the session and log-in.
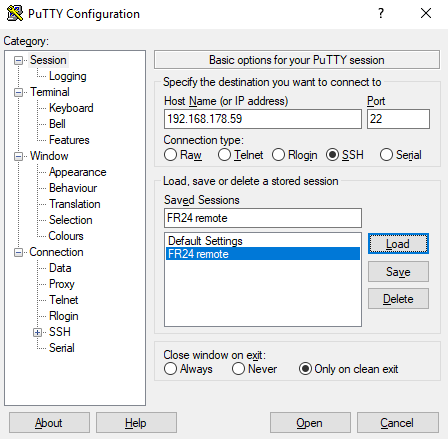
My example of the PuTTY configuration.
Only two more steps until you can install the FR24 feeding-software itself. First one is to install the Dirmngr by typing sudo apt-get install dirmngr. After the installation process It is also mandatory to install the Receiver Drivers with the command:
sudo wget -O /etc/udev/rules.d/rtl-sdr.rules https://raw.githubusercontent.com/osmocom/rtl-sdr/master/rtl-sdr.rules.
With this being done you can start installing the actual feeding software, which is, thanks to a software-package by the awesome guys at Flightradar24, fairly easy, as all you need to do is execute the command:
sudo bash -c „$(wget -O – http://repo.feed.flightradar24.com/install_fr24_rpi.sh)“
The installation process will complete by asking you for several inputs. An email, to which this feeder will be linked to (your FR24 account email), latitude, longitude elevation. It will also ask you if you want to participate with the MLAT processing (allowing FR24 to assume aircraft locations even without active feeders beyond your reach) and other inputs. Decide for yourself.
After all of this you will be offered to start the Feeding.

Congratulations!
FR24 Statistics and Business Plan
As soon as you have started feeding you might see that a new option in the Flightradar Web version has been added. The “My data sharing” category will show you your current Feeders and if they are active or not. You can also check its statistics and see for example how many aircrafts your feeder has already been able to find or how big your range is. The feeders range is highly affected by the localization of the antenna. For the best results place it in your attic, your terrace or any other open place without big walls around it.
Flightradar servers will automatically send you two emails of which both confirm, that you are now an active feeder and as long as your Raspberry is online, you are owning a Business subscription. IF you are not instantly seeing a change in your current status as a basic member, don’t worry, as it might take some time to actually update your status (20minutes in my case).
If you still have any questions, feel free to contact me.
Links
DVB-T Receiver:
https://shop.jetvision.de/epages/64807909.sf/en_GB/?ObjectPath=/Shops/64807909/Products/53200
Raspbian Jessie Lite:
http://domoticx.com/raspberry-pi-sd-image-raspbian-linux-os/
Etcher:
Source:
Flightradar Official Guide: